

Added 9/22/09: Rhoda is also having her beadboard wallpaper party today that I'm linking my laundry room cabinets and tray to. Go see what everyone else is wallpapering :)
We're talking about gifts this week! Things to be on the lookout for now amidst your thrifting to make the holiday gift giving a little less expensive and hectic.
Today, we're talking trays!
Keep your eyes open for these at yard sales and thrift stores. They are pretty inexpensive at craft stores as well~usually between $3-$5 with coupons. Here is one of the trays I found at a yard sale a while ago for 50 cents that I want to makeover:
 I spray painted the top part in Rustoleum's Heirloom White, then hot glued the knobs to the bottom:
 I spray painted a piece of the paintable beadboard wallpaper cut to size a bluish greenish color called Glacier Blue. It was on clearance at Walmart and I may just have to run back to see if there is any left~I love this color!
 Here's how it turned out:
 Need some more tray inspiration?
I love this one that Kimm made for her bathroom counter:

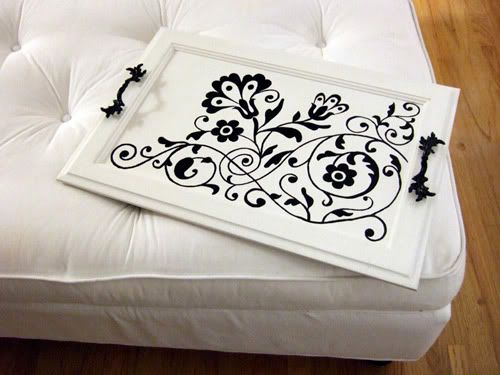
Here is one Crafty Nest made from an old cabinet door:
 And one that Lindsay re-purposed for her lovely vignette:

Joy has some fabulous trays ideas as well that you need to see:

I know there are many more tray ideas out there in blogland. If you have one, or know of one, feel free to link it up below so we can see!
I'm also joining Rhoda's Thrifty Treasures Monday:

Have a great day!


I have a couple of trays I used for some inspiration~this one I bought almost 10 years ago at Target and have used in various places throughout my homes~right now it's being used on the kitchen desk as a little catch all for the school calendar, my daily planning notebook, Webkinz codes, a little Darth Vader whose cape we're on the hunt for, health insurance cards that need to go into our wallets, and coupons that need to be put in my little purse coupon file.
 I love the beadboard bottom
 and the handles on the side of it:
 The other tray I use is from the Target 75% Easter clearance~it's just on my front entryway table:

On to the makeover:
I got these little knobs at Hob Lob for half off that I am going to use for tray feet. If you can find any that are missing the screw, even better. They gave me a couple for free and it saved me from having to break them off. The other two I paid $2 each for.
 I love the beadboard bottom
 and the handles on the side of it:
 The other tray I use is from the Target 75% Easter clearance~it's just on my front entryway table:
On to the makeover:
I got these little knobs at Hob Lob for half off that I am going to use for tray feet. If you can find any that are missing the screw, even better. They gave me a couple for free and it saved me from having to break them off. The other two I paid $2 each for.
 I spray painted the top part in Rustoleum's Heirloom White, then hot glued the knobs to the bottom:
 I spray painted a piece of the paintable beadboard wallpaper cut to size a bluish greenish color called Glacier Blue. It was on clearance at Walmart and I may just have to run back to see if there is any left~I love this color!
 Here's how it turned out:
 Need some more tray inspiration?
I love this one that Kimm made for her bathroom counter:
Here is one Crafty Nest made from an old cabinet door:
 And one that Lindsay re-purposed for her lovely vignette:
Joy has some fabulous trays ideas as well that you need to see:
I know there are many more tray ideas out there in blogland. If you have one, or know of one, feel free to link it up below so we can see!
I'm also joining Rhoda's Thrifty Treasures Monday:
Have a great day!

Our front yard (like the rest of the house) was a mess when we moved in: pretty much no grass, huge overgrown trees, a gold storm door, and in need of lots of tlc.
First, we had the big, dying pine trees cut down:
First, we had the big, dying pine trees cut down:

Then, we dug up all of the dead grass, and then tried to level the dirt out as much as possible. (When I say we, I mean my husband. )
We also had sprinklers installed.

We planted Pennington (low water, sun-shade) fescue grass seed, and in a few weeks we had a lawn. We have also used some sod in the backyard that hasn't done as well. I would choose seed over sod any day~it's much less expensive as well. This is a year later after~he uses Scott fertiler 4-5 times a year and we water deeply 2 times a week.
 For our front area, we just put down some heavy duty landscape fabric to keep weeds out $30
river rock $50
edged it with a bag of color stay mulch $4
added two trees from Walmart $9 X 2 = $18
a bush in the middle $5
two yellow lantana bushes $6 X 2 = $12
vinca flowers along the edge: $10 total (more on these here)
Total: $129
It's pretty much maintenance free~when we had the sprinklers installed, we had a drip put in this area.
 The house already had this lovely aggregate border, but you could never really notice it with the big pine trees and dirt:
I was worried with my black thumb that my vincas wouldn't make it, but they held up beautifully in the Texas heat/wind/storms.
Tip of the day: This is a great time of year to take a look at what plants and flowers worked well through the summer in yards around your town. If it's still thriving in August/September, take note of it for when you plan your landscapes and gardens next spring. Do a drive by and take pictures (if you're brave!) or if they are outside, ask them about what they've done.
I'm excited for next week; we're going to talk about gifts we can make or makeover, start thinking about, or be on the lookout for now amidst our thrifting so things aren't so crazy come November and December. Each day I'll put a mr. linky up so you can link up if you've got some great ideas for the fabulous frugal gifts we're talking about that day.
On Friday, you can share any frugal gift idea your heart desires to share with us :)
Until then~have a great weekend!

Remember the fresh curly willow branches I had in the bathroom? I loved them, but after a month, the leaves dried up and the branches turned black. They looked kind of scary. (should have taken a picture of the scary branches, Melissa!)Enter my inspiration: some PB sticks.
Not so scary because they have pretty blossoms on them:
Enter my inspiration: some PB sticks.Not so scary because they have pretty blossoms on them:
 I was thinking I could even glue some fake blossoms on the now black sticks, but thankfully found some of these beauties at Michaels in their mega store clearance for $4 total. Sticks with blossoms attached!
No gluing necessary, just stuck them amidst the scary dried black sticks here and there:

Sticks revived and here to stay!

It's Thursday, which means it's DIY day over at Kimba's!


Remember this deep, dark den design challenge?? We all shared our thoughts, inspiration pics, and links with Sara,
and she and her husband have been hard at work:
look at what they've done!
look at what they've done!

Such a difference~you can see more here. Thanks, Sara!
If you have a design challenge you need help with and you're ready to get to work on your "after" pictures~email your pics to
melissa.320sycamore@gmail.com
Let me know what your dilemma is, and you may be featured to get free advice and thoughts on your space.
Happy Tuesday!

Did you think I was ever coming back? :)
My vacation was a little longer than I had anticipated, but it was so nice. It's good to be back and there is nothing like fresh Montana air to clear your head, but this girl has got to get her head on and get back to a routine after crazy, lazy summer days and 50 hours (roundtrip) of time in the car with 5 kids! Wowsers!
I was sure if we stopped to pick up a hitch-hiker, he would take a peek in the van and say,
"ummm, thanks, but I think I'll walk." My husband was too nice to try it though... :)
I picked up some fun thrifty treasures at yard sales while we were visiting and wanted to share:
a sweet little fall wreath for $1:

shabby hook for .50:

Karen Neuberger pj's for $1.50 (Oprah introduced me to KN, and I love them. My mom got me some after my 2nd baby, and they have been my favorite pjs)

Dooney & Bourke handbag for fall (not authentic, but I still loved it)

I hit the jackpot for kids' clothes Friday morning at a yard sale: it was all you could stuff into a shopping bag for $1. I stuffed 3 bags full (this is only about half of what I got), so my grand total was $3. I was dying that they had a bunch of boys size 5T jeans without any holes~miracle!! I also got a bunch for my oldest daughter. The only thing I had to buy for my son this year was underwear and socks. Yard sales have been a huge blessing for us for saving $$ on kids' clothing.
I don't even want to talk about what I couldn't bring home at these fantastic sales, but let's not dwell on that...I also got a lot of vintage toys I'm going to try to sell on Ebay~I'll let you know how it goes...
 It's good to be back!
I'm joining (very late) Rhoda's Thrifty Treasures:


I was going to be one of those amazing bloggers that gets posts all ready to go before she goes, but it didn't happen. I kind of forgot what it takes to get ready a family of 7 to go for 2 weeks :)
We're back in my beloved Montana~this is where I grew up! I have learned that there is beauty to be found wherever you go, but my heart is still here:

We're having a wonderful time, but don't you worry, I'll be back. :) Taking lots of pictures of great ideas I want to share with you~see you soon!


Update 9/22/09: Rhoda is also having her beadboard wallpaper party today that I'm linking my laundry room cabinets and tray to. Go see what everyone else is wallpapering :)
Basically, I just followed Rhoda's wonderful, precise directions:
 I measured to fit the inside of the cabinets (I would leave a little room on the edges because it seems to expand a tiny bit when it gets wet)
I used one of the lines in the beadboard that was closest to the measurement I needed so I could cut as straight as possible:

This worked wonderfully, because the holes that were drilled were not the size I needed, so I just papered right over them:

I just got them wet for about 30 seconds in the sink, let them sit for a few minutes (I guess it's called booking??) and then flattened them out onto the cabinet (I didn't even prime or sand the cabinet before papering) and smoothed them out with my hands. No special tools required! I let them dry overnight,

The next day, I primed them, then painted them Rustoleum Heirloom White (you can buy it in the quart cans next to the spray paint at Home Depot) with a roller brush. Spray paint would work too, but I had this left over from my hall cabinets:

Poked the knob through the bottom hole, put the hardware back on, and there we have it! Simple, painless, and beautiful! It gives the cabinets such a custom look:


A few notes:
Lowes has some paintable wallpaper, but in my opinion it doesn't look like real beadboard. I had it in my project pile to use, then I saw Rhoda's and the wall doctor stuff looks so much better. Back to Lowes it went! Spend the extra ten dollars on the Wall Doctor brand wallpaper. I got mine from the Home Depot, but you can also get it at Graham & Brown.
Some of you have asked about using it in high traffic areas, or on kitchen cabinets, and I would hesitate because it's kind of a foamy texture that hardens up a bit when you paint, but look what my nail can still do to it

I have pictures of my boys running their cars over it and decided it wouldn't do well in our kitchen...
BUT think of the other possiblities: look at what moonkat99 over at the Garden Web forums did to her ceiling, y'all! It's gorgeous!
Here it is before:
 And after: who would ever know it's wallpaper??
I've got a few more projects in mind for my big ol' roll of leftover wallpaper :)
It's DIY day over at Kimba's!
Subscribe to:
Posts (Atom)
Social Icons