

Hello! I have boys that LOVE Legos and it has always been a storage frustration with what to do with all of them. We've tried plastic totes and separating them by color but their collection quickly outgrew those little plastic drawers and let's be honest -- they never stayed separated by color. We also tried keeping them on a big blanket so you can move them and gather them up quickly but we're ready to try something new down in the basement next to the ping pong table. We got these cube storage shelves from Walmart and I've already shared my love of these BH&G storage totes that hold all of the Legos, plus ping pong balls and paddles.

I have also loved these wood Studio McGee lamps at Target that we put on each end -- they also have a dimmer switch on them!

This isn't the first time we've used the cube organizers -- they are great in boys' closets and one of the most popular posts on 320 Sycamore -- a mini closet makeover. They make the cutest storage bins now!

I would love find something great to put on the wall above the cube organizers -- I'll keep you posted! I hope this gives some ideas for the things you need to organize. Thanks for stopping by.


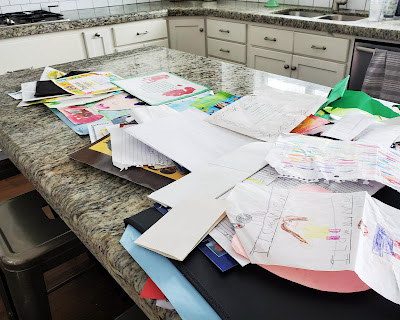
I had been looking for a good solution to store everything and decided on these 14X17 art portfolios. (ETA: this one on Amazon is only the 12 page! If you want the 24 page/48 view look here on B&H Photo) I love them because they are larger than your typical binder or photo album so they are perfect for artwork!
Everything had been in a big storage bin and so I sat on the bed and sorted and sorted and threw things away. Then I brought each child's pile out to the kitchen island and tried to sort into chronological order.


Hello there! I shared the pencil printable Valentine last week but if you missed it or it's not your thing I'll share what my boys are giving this year.
Sam's Club has a 46 pack of Takis for $12.18 and Amazon also has them for a few dollars more we are going with it! It seems to be the popular treat around these parts so I am sharing a printable for you to use. I was going to come up with a cute poem or clever saying but it just wasn't coming so it's just a simple Valentine with fire.

Have a great day -- thanks for stopping by!

This is a family favorite and so super easy! A little messy but a great kid friendly option for a busy night.
Preheat oven to 475 degrees or 450 degrees convection.
Take some cooked quicken from a rotisserie or your instant pot or cook some up, add a can of black beans, some white cooked corn (I love the super sweet frozen corn from Costco or the steamable bags or you could use canned) and stir it together. You could also add some tomatoes but we like to add salsa on top after they have baked. Then add equal parts of some bbq sauce and ranch dressing and mix it up with a large spoon.
Note: the original recipe from a magazine called for simply mixing chicken with salsa but my kids love this bbq-ranch combo that my sister Kelsey used on a salad at a family reunion and it just kind of came to be. Combinations and possibilities are endless with this recipe!
Line a large baking sheet with foil for easy clean up and spray with cooking spray.
Then take some flour tortillas and spray one side with cooking spray (your choice) or you can melt real butter and use that.

Flip the tortilla over, fill with the chicken mixture

Then, top with cheese.

Fold over (cooking spray should be on the outside) and bake for about 5-7 minutes, but watch closely after 4 minutes. They will be crisp on the outside and warm and delicious on the inside. I cut them in half with a pizza cutter and serve with salsa, sour cream, and avocado. Cut up some watermelon and grab a bagged salad and you are set!

They aren’t the neatest meal, but so good!! This is the pan I forgot to line with foil – you’ll definitely want to use the foil for easy cleanup.

Cowboy Chicken Quesadillas
Preheat oven to 475 degrees or 450 degrees convection. Line baking sheets with foil and spray with cooking spray.
Ingredients:
Canned black beans
Cooked white corn
Cooked chicken
Bbq sauce
Ranch dressing
Shredded cheese
Flour tortillas
Cooking Spray
Mix together the black beans, corn, and chicken. Add equal parts of bbq sauce and ranch to desired consistency. Spray one side of tortilla with cooking spray, turn over and fill one side with chicken mixture then top with cheese and fold over. Cooking spray side should be on outside. Bake for 5-7 minutes, begin watching closely at 4 minutes until they reach desired crispness on edges. Cut in half with pizza cutter and serve with salsa, sour cream, and avocado. Enjoy!

We offered 6 chocolate dipped strawberries for $10 and
3 caramel chocolate dipped pretzel rods for $6 with delivery on February 13 or February 14.
*Note: we now only do chocolate dipped strawberries to keep it simple. We offer 6 for $10 or a dozen for $18. Scroll down to see the pretzel/caramel instructions if you would like to see those.
She made up a little digital flyer on PicMonkey

and then texted it to all of our neighbors, church friends, her friends, teachers, leaders, co-workers, etc. Small business owners are great to contact as well to see if they would like to order for their employees. We were going to do some paper flyers but everyone responded really well to the text and email. She received most payments through Venmo and kept track of the orders on a chart.
Here is an updated video on Instagram stories showing the whole process. To keep it simple we only do strawberries and we put them on the mini cupcake liners in the clear hinged container. To see the pretzel rod instruction, scroll to the end.
Here are the supplies you’ll need:
- strawberries (we found the best at Sam’s Club and Costco) – you’ll want to check out who has the best and be ready to buy the day before or morning of. Buy extra because not all strawberries in the package are pretty or ripe.
- milk and semi-sweet chocolate chips (we love Ghirardelli from Sam’s but Nestle Tollhouse work as well) see recipe below.
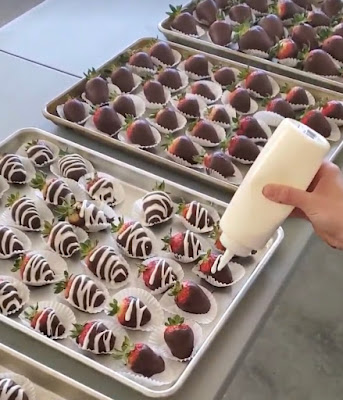
- white chocolate for drizzling. We just use white chocolate chips and these simple funnels to put into little squeeze bottles made it a breeze to drizzle.
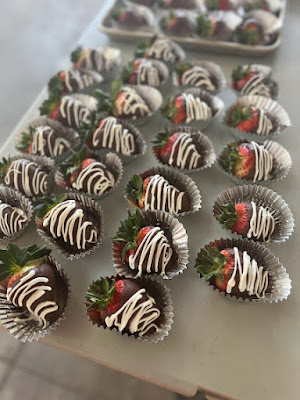
- clear hinged containers – we used these from Amazon since we had almost exactly 50 orders, if you have more these are your best deal at Sam’s Club. We use the 5X5 size for 6 count orders and the 8X8 size for dozen count orders. If your strawberries are big you may have to do another layer of a few strawberries so make sure they are deep enough. The ones I linked too were great for us.
- ribbon – I have a huge ribbon stash that we used but this is a good deal on red sheer ribbon or we have found some fun Valentine ribbon at the dollar store. We have also used baker's twine with a cute heart gift tag
- we now use the mini cupcake liners to place the strawberries in. Our strawberries were huge this year so we also used some of the foil standard size or Walmart had some cute red and white Valentine ones in their Valentine baking section for the same price. You can also do some fun paper on the bottom if you want but it's not necessary. We have used red and white polka dot wrapping paper from Hobby Lobby and we secured it with a few small pieces of double stick tape. Scrapbook paper would also work and we also have used red heart doilies from the Dollar Tree.

1. Day/night/weeks before: order supplies online and in stores, cut ribbon, line containers with paper (optional), map out delivery route and let them know what time you’ll be coming. Do a test run to make sure you’ve got the caramel, chocolate, and dipping down.
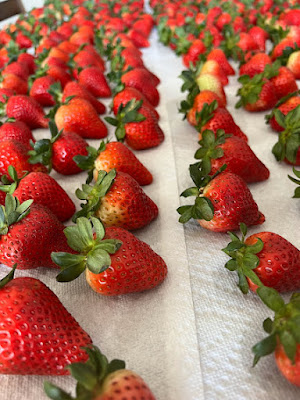
2. Morning of delivery: rinse all berries and set out to dry on paper towels. They must be completely dry to dip. Separate the pretty berries and save the not so pretty ones to freeze for smoothies or to make jam. We tried to do 2 big strawberries and 4 medium ones per package.
3. Make chocolate dip
Get a large glass microwaveable bowl. Add:
2 cups semi-sweet chocolate chips
2 cups milk chocolate chips (or whatever combination you like best.)
4 tsp shortening or coconut oil
Microwave, stopping and stirring every 30 seconds until melted OR you can melt over low heat in saucepan. Don’t overcook!
4. Dip strawberries about 2/3 of the way up, set on trays lined the mini cupcake liners. Let cool in garage, fridge, or freezer (don’t let them freeze though, just enought to cool!)
5. When the chocolate on the strawberries is set, melt the white chocolate in the microwave. We just put a bag of white chocolate chips in a glass bowl, add a Tablespoon or so of coconut oil and melt in microwave. (1 minute, stir, 30 seconds, stir, keep going until it's smooth) and then immediately pour into squeeze bottles with a funnel like this or in a Ziploc bag with a tiny corner cut off and drizzle away!
6. When they are all completely cooled and set, package them up!


A few other tips here:
- as I said before we have learned a lot in our years of doing this and only do strawberries now and just do one day of delivery (usually Valentine's Day right after school but we let them know we are available to deliver to offices as well) and that cuts down on time immensely. If Valentine's is on a weekend that will give you a lot more flexibility or you may want to do it on that Friday. We wash the strawberries first thing in the morning (7 a.m.) in colanders and give them a couple of hours to dry spread out on paper towels and prep everything else in the meantime: set up tables in the cool garage, cut ribbon, get delivery route ready, etc. Start dipping around 10 a.m., white chocolate drizzle around 12, packaging around 1-2 p.m. and then begin delivering at 3 p.m. and try to be all wrapped up by 5 p.m.
- I mentioned earlier to do a trial run! Everyone has different microwaves, pans, chocolate chips, etc. so it’s good to get it down so you know what you are doing the day of.
- Friends are great to help – be sure to have them pull their hair back and wear gloves! We had people dipping, drizzling, running pans back and forth to the garage, cutting paper, packaging, tying ribbons, separating for delivery.
- If you are doing a LOT it may be helpful to have a procession line and have crockpots on warm and keep filling them with melted chocolate.
- You don’t have to offer delivery but most of ours were right in the area around our house. You could also have them come pick them up. It is a perfect fundraiser for Valentines or Mother’s Day!
Good luck! It is a lot of work for the 2 days but she ended up making $900 after supplies (people were very generous to donate extra since it was for a humanitarian trip) so it was well worth it. Let me know in the comments if you have any questions!
- caramel to dip(see recipe below)
- holiday themed sprinkles, if desired
Caramel Recipe we love:
- 1/2 cup butter (1 stick)
- 1 cup white sugar
- 1 cup brown sugar
- 1 cup light corn syrup
- ½ teaspoon salt
- 1 can (14 oz) sweetened condensed milk – we like Eagle Brand best


Hello! We had such a wonderful fall break in Zion National Park. If you’re thinking about going in the fall I would say YES! Do it. We’ve been there in the summer and let me tell you, the weather is a game changer. It was high sixties to low seventies, perfect for hiking and all things outdoors where everyone seems to kind of wilt in the heat of the summer. The colors were also unbelievable this year.

Here’s what we did: (none of this is sponsored or gifted, just our own experience)
We rented an RV from Cruise America (we got the large) and stayed at Zion Canyon Campground. My boys (ages 13, 10, 8) LOVED the RV and my daughters (ages 17, 15) tolerated it. If you will be camping, I would first look into the NPS Watchman Campground – it is only $30 per night for RV’s and $20 for tents but begins booking 6 months in advance and they go quick, so mark your calendars!

We liked the Zion Canyon Campground, it is right outside of Zions and there is a shuttle stop right in front of it so once we were parked we didn’t have to move again. It also has bathrooms and showers so we didn’t even have to use the RV one which was nice because we didn’t have to pay the dump fee. And the boys loved the pool there.

Some pros of an RV: you can bring all of your own food and use the microwave, refrigerator, cooktop. And there is just something magical about the campfire for scary & funny stories that you can’t get in a hotel. Some favorite camping foods we had there: campfire cones, hot ham & cheese campfire croissants, Trader Joes coconut pancakes and of course just s’mores and we love the pretzel rolls from Costco to make sandwiches with. We also just got burgers in town one night so we could watch the baseball playoffs.

I would say the cons of the RV would be the price – we paid about $400 for 3 nights plus about $125 in gas plus $45 per night for 2 nights in the campground. The beds are not the most comfortable and then of course putting away all of the bedding, food, and equipment when you get back and then cleaning the RV before returning it, but really it was for the experience right?? And hotels in Zions are not cheap, so you have to factor that in as well.
Our most favorite thing we did in Zions was bike down Zion Canyon. We fit 4 of our bikes in the storage area under the RV and then rented 3 more from Zions Outfitters – they are literally steps outside the entrance to Zions. They are pricey though – $25 for adults for 5 hours and $15 for kids, I would bring bikes if you can, it may be worth renting a bike rack.

Originally we were just going to bike the Pa’rus Trail along the Virgin River. It is an easy, wide, paved biking walking trail with pretty scenery, about 1.5 miles long from the Visitors Center to Stop 3 –Canyon Junction.
I was talking to the shuttle bus operator the night before and he said the best thing to do with bikes is to ride from the Visitors Center to Canyon Junction (stop 3) on the Pa’rus Trail. Then, you can put your bikes on the front of the shuttle buses and take the shuttle to the top at stop 9, the Temple of Sinawava and bike down through Zion Canyon to Zions Lodge (stop 5).

The cool thing is there is NO traffic, just a few shuttle buses that will go around you and just one small uphill part. So we did it, and it was spectacular. So, so gorgeous! We left around 9 a.m. and literally had the place to ourselves. During Utah fall break! Just a note here: each shuttle only holds 2 or 3 bikes on the racks so we had to split up into 3 separate groups but the shuttles were coming every 5-10 minutes so it wasn’t bad, but something to consider in your planning.

I shared a little video of us biking on Instagram.

Then you can stop at the Lodge and get lunch or have a picnic (and ice cream!) on the big beautiful grass area. From there you can head back or cross the street to the Emerald Pools hike, which is great for families as you can stop at the lower pool with the littles or head up to the middle and upper pools with your older kids.

We opted to head back to the campground after biking for lunch and swimming and then come back up the canyon in the afternoon when the crowds weren’t so crazy. When we got off the shuttle at the Visitor’s Center around noon the lines were unbelievable –very long, so I would get an early start if you can. It also really dies down around 5 p.m. which I think is the most beautiful time to be up in the canyon with the sun setting.

Another favorite that we did the night before was the Weeping Rock – super easy for everyone but so beautiful!

My older kids want to go back this spring and do Angel’s Landing and the Narrows!!

So, Zions in the fall gets double thumbs up from us. I hope this helps if you are thinking of going there. Any questions, let me know!


Hello! I have two teenage daughters and we’re in a new phase of life: formal dances! I wanted to share a resource we discovered last year when we were searching for prom dresses. It’s called Rent the Runway and it was such a lifesaver for us.
Basically, you get access to thousands of quality, designer dresses and can filter by length, sleeve, color, neckline, event, formal, night or day. People post dozens of pictures saying this is how it fit, this is what size I am so you can get a good feel for what size to order -- PLUS you get a FREE back up size so it’s pretty certain that one will fit.
Your two dresses arrive via UPS a few days before your event and then you just put it back in the box after your event and leave it at a UPS location or drop box. They will clean it and that is it!
Here are two of the dresses Lauren got last year – the Cindy Cascade gown $110
and a more casual (but this was her favorite!) Paper Crown Lafayette Maxi $40

Here is a pic of her in both:

Prices vary, but something we loved is that designer dresses fit SO well. We ordered a homecoming dress on Amazon but it just didn’t fit right and after alterations we spent more than renting one. I love not driving around all day trying on and getting discouraged, especially with the price! We talk budget and then she just gets on and can look for her favorites. Also, the chances of someone having the same dress are pretty slim because there are SO many to choose from.
It’s perfect for any age – remember it you have a special occasion to dress up for: a wedding, gala, military ball, holiday party. Right now, you can get 20% off your first order when you sign up and use the code FIRST and then you can also get $30 coupon codes when you share with friends.
Anyway, we discovered it last year and I just wanted to share it with you if it can make your life simpler in any way – you know I only share things I LOVE! Any questions, let me know!
AND I can’t leave without a shout-out to all of our friends that are suffering in Houston and the surrounding area. It is incomprehensible to watch on the news. Did you see that Chip & Joanna are giving ALL proceeds from their Texas Forever shirt to Hurricane Harvey disaster relief efforts? ♥ God Bless Texas!!


Utah Valley Parade of Homes was in June and I wanted to share some of my favorite ideas I spotted – here is the first round!
Adorable desk area with a simple wire to hang artwork:
These beautiful mural (wallpaper??) in a teen girl room:

Navy shiplap with white shelving? Yes please!

More fun shelving in a study/reading area:

A simple shelf with brackets above a bed for artwork, pictures.

This house had a slide entrance upstairs in the family room in that lower cabinet

that came out downstairs in the playroom! How fun

Another happy study area:

A wall of clocks! But I think I would take out the batteries, it might be a little loud:

Attached barstools on this huge gorgeous island – a dream to sweep under!

This gorgeous brick wall in the dining area (and that light fixture!!)

A clever use of the slope of the ceiling to hang this board:

Pretty greige closet doors in an otherwise white hallway:

Hang those lightsabers and simple star wars prints for some fun in the kids’ room:

I love seeing new ideas at the Parade every year.. more to come! I hope you enjoyed these ~

Social Icons