

More gift ideas! Today we're talking display boards/ inspiration boards/ bulletin board goodness:

adorable cork boards with beadboard from Karla at It's the Little Things...

Here is Amy's board, complete with matching star!


Christina at As Time Goes By used burlap and old music:

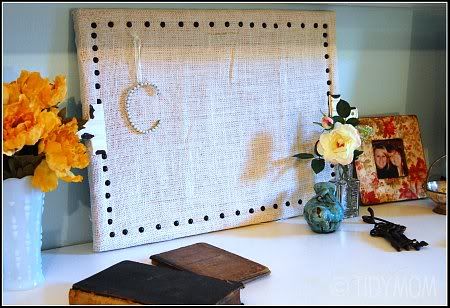
Inspired?
Have some more board inspiration~please link it up below! We'd love to see:
ETA: for some reason, yesterday's mr. linky showed up, so I'm editing out the ones from yesterday~sorry 'bout that!
Tomorrow is an open linky party~I would love to see any ideas you have or have done in the past for gift giving!
Until then~
Until then~


Can you imagine what blogland would be without chalkboard paint??
Today, we're going to look at chalkboard paint through a gift givers eye. Look at these beauties and see if they don't getyour wheels turning about what you can turn castaways lurking on thrift store shelves and yard sales (maybe even your cupboards) into for your friends/co-workers/family/you get the picture.
First up, here are some silver trays turned to chalkboards:
Jen from Balancing Beauty and Bedlam welcomes her family home with this one:
Jen from Balancing Beauty and Bedlam welcomes her family home with this one:
Shannon at Bless Our Nest has made over a lot of trays. I love 'em all!

Here is one on Jen's( from Tatertots and Jello) door:

Wendy at The Shabby Nest and her cute dollar store tray:
 (Wendy, I copied this picture but I would never steal your whole blog :) The nerve!)
Frames are fab finds as well~look what these were turned into:
Darlene at Our Creative Life turned an old picture into this beauty:

I adore this one from Holly Mathis Interiors:

Look at this long and lush one by Amanda at Imperfectly Beautiful:

I could go on and on, but I'm going to stop and let you link up your chalkboard projects that could be great gifts~I know there are a hundred jillion more ideas out there and the possibilities are endless. Show us what you've got up your creative chalkboard painting sleeve!

First of all, Happy September! Did you say rabbit? Always say rabbit on the first day of the month and you'll have good luck for the whole month (from my 8th grade English teacher, Mrs. Lees~does anyone else do this??)
Thanks to everyone that shared their tray makeovers yesterday!
Welcome to day 2 of gift ideas!
This one is sooo simple, involves fabric (but no sewing), and can be done in less than 10 minutes~ right up my alley! I first saw it on my friend Amanda's blog, and she directed us to this tutorial from Tory at Funky & Delightful.
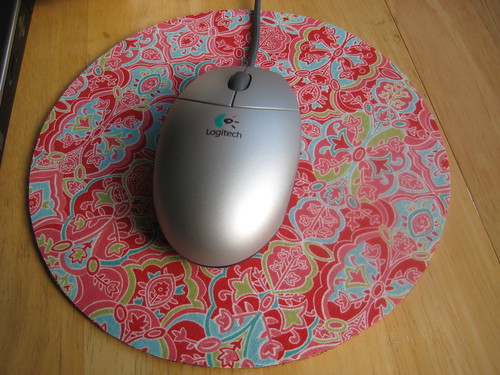 photo from Funky & Delightful
She gives great directions and gave me a great way to use the cork squares I found at a yard sale over the summer. I've also seen the cork squares at Hob Lob and at Target in their back to college section. You could also cover an existing mouse pad, like Amanda did:
 photo by Amanda
Look at what the always fabulous
Kate@Centsational Girl did with hers (she also gives a fab tutorial):
 photo by Centsational Girl
Here's the one I did and am planning to do lots more---soooo easy:

Wouldn't these be cute to give with the trays from yesterday? These would be great for co-workers, teachers, secretaries, friends...keep your eyes open for cork or spare mousepads and cute fabric. You don't need much fabric at all~an old shirt or dress cut up would work perfectly.
If you've dressed up a mouse pad or seen others, go ahead and link them up so we can see:
Happy Tuesday~

Added 9/22/09: Rhoda is also having her beadboard wallpaper party today that I'm linking my laundry room cabinets and tray to. Go see what everyone else is wallpapering :)
We're talking about gifts this week! Things to be on the lookout for now amidst your thrifting to make the holiday gift giving a little less expensive and hectic.
Today, we're talking trays!
Keep your eyes open for these at yard sales and thrift stores. They are pretty inexpensive at craft stores as well~usually between $3-$5 with coupons. Here is one of the trays I found at a yard sale a while ago for 50 cents that I want to makeover:
 I spray painted the top part in Rustoleum's Heirloom White, then hot glued the knobs to the bottom:
 I spray painted a piece of the paintable beadboard wallpaper cut to size a bluish greenish color called Glacier Blue. It was on clearance at Walmart and I may just have to run back to see if there is any left~I love this color!
 Here's how it turned out:
 Need some more tray inspiration?
I love this one that Kimm made for her bathroom counter:

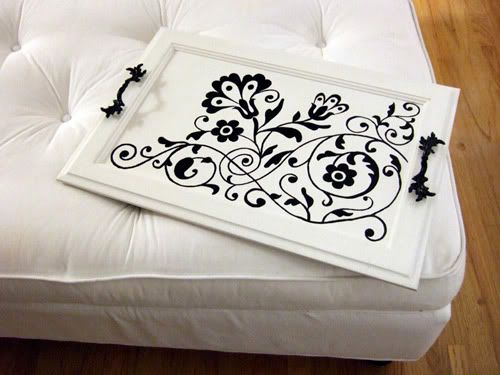
Here is one Crafty Nest made from an old cabinet door:
 And one that Lindsay re-purposed for her lovely vignette:

Joy has some fabulous trays ideas as well that you need to see:

I know there are many more tray ideas out there in blogland. If you have one, or know of one, feel free to link it up below so we can see!
I'm also joining Rhoda's Thrifty Treasures Monday:

Have a great day!

I have a couple of trays I used for some inspiration~this one I bought almost 10 years ago at Target and have used in various places throughout my homes~right now it's being used on the kitchen desk as a little catch all for the school calendar, my daily planning notebook, Webkinz codes, a little Darth Vader whose cape we're on the hunt for, health insurance cards that need to go into our wallets, and coupons that need to be put in my little purse coupon file.
 I love the beadboard bottom
 and the handles on the side of it:
 The other tray I use is from the Target 75% Easter clearance~it's just on my front entryway table:

On to the makeover:
I got these little knobs at Hob Lob for half off that I am going to use for tray feet. If you can find any that are missing the screw, even better. They gave me a couple for free and it saved me from having to break them off. The other two I paid $2 each for.
 I love the beadboard bottom
 and the handles on the side of it:
 The other tray I use is from the Target 75% Easter clearance~it's just on my front entryway table:
On to the makeover:
I got these little knobs at Hob Lob for half off that I am going to use for tray feet. If you can find any that are missing the screw, even better. They gave me a couple for free and it saved me from having to break them off. The other two I paid $2 each for.
 I spray painted the top part in Rustoleum's Heirloom White, then hot glued the knobs to the bottom:
 I spray painted a piece of the paintable beadboard wallpaper cut to size a bluish greenish color called Glacier Blue. It was on clearance at Walmart and I may just have to run back to see if there is any left~I love this color!
 Here's how it turned out:
 Need some more tray inspiration?
I love this one that Kimm made for her bathroom counter:
Here is one Crafty Nest made from an old cabinet door:
 And one that Lindsay re-purposed for her lovely vignette:
Joy has some fabulous trays ideas as well that you need to see:
I know there are many more tray ideas out there in blogland. If you have one, or know of one, feel free to link it up below so we can see!
I'm also joining Rhoda's Thrifty Treasures Monday:
Have a great day!

Our front yard (like the rest of the house) was a mess when we moved in: pretty much no grass, huge overgrown trees, a gold storm door, and in need of lots of tlc.
First, we had the big, dying pine trees cut down:
First, we had the big, dying pine trees cut down:

Then, we dug up all of the dead grass, and then tried to level the dirt out as much as possible. (When I say we, I mean my husband. )
We also had sprinklers installed.

We planted Pennington (low water, sun-shade) fescue grass seed, and in a few weeks we had a lawn. We have also used some sod in the backyard that hasn't done as well. I would choose seed over sod any day~it's much less expensive as well. This is a year later after~he uses Scott fertiler 4-5 times a year and we water deeply 2 times a week.
 For our front area, we just put down some heavy duty landscape fabric to keep weeds out $30
river rock $50
edged it with a bag of color stay mulch $4
added two trees from Walmart $9 X 2 = $18
a bush in the middle $5
two yellow lantana bushes $6 X 2 = $12
vinca flowers along the edge: $10 total (more on these here)
Total: $129
It's pretty much maintenance free~when we had the sprinklers installed, we had a drip put in this area.
 The house already had this lovely aggregate border, but you could never really notice it with the big pine trees and dirt:
I was worried with my black thumb that my vincas wouldn't make it, but they held up beautifully in the Texas heat/wind/storms.
Tip of the day: This is a great time of year to take a look at what plants and flowers worked well through the summer in yards around your town. If it's still thriving in August/September, take note of it for when you plan your landscapes and gardens next spring. Do a drive by and take pictures (if you're brave!) or if they are outside, ask them about what they've done.
I'm excited for next week; we're going to talk about gifts we can make or makeover, start thinking about, or be on the lookout for now amidst our thrifting so things aren't so crazy come November and December. Each day I'll put a mr. linky up so you can link up if you've got some great ideas for the fabulous frugal gifts we're talking about that day.
On Friday, you can share any frugal gift idea your heart desires to share with us :)
Until then~have a great weekend!

Remember the fresh curly willow branches I had in the bathroom? I loved them, but after a month, the leaves dried up and the branches turned black. They looked kind of scary. (should have taken a picture of the scary branches, Melissa!)Enter my inspiration: some PB sticks.
Not so scary because they have pretty blossoms on them:
Enter my inspiration: some PB sticks.Not so scary because they have pretty blossoms on them:
 I was thinking I could even glue some fake blossoms on the now black sticks, but thankfully found some of these beauties at Michaels in their mega store clearance for $4 total. Sticks with blossoms attached!
No gluing necessary, just stuck them amidst the scary dried black sticks here and there:

Sticks revived and here to stay!

It's Thursday, which means it's DIY day over at Kimba's!


Remember this deep, dark den design challenge?? We all shared our thoughts, inspiration pics, and links with Sara,
and she and her husband have been hard at work:
look at what they've done!
look at what they've done!

Such a difference~you can see more here. Thanks, Sara!
If you have a design challenge you need help with and you're ready to get to work on your "after" pictures~email your pics to
melissa.320sycamore@gmail.com
Let me know what your dilemma is, and you may be featured to get free advice and thoughts on your space.
Happy Tuesday!
Subscribe to:
Posts (Atom)
Social Icons