


the holes didn't fit any modern handles, so we filled them with wood filler, let them dry and then sanded them down to smooth. I'm such a genius, I forgot that we only needed to fill one hole, the other would be for the knob. :) I eventually figured it out...
Then, we sanded the doors, primed them with a spray paint primer,
 and we used these to paint them with:


Here is the other area of the bathroom~I found the shower curtain last year on clearance at Target for $6.24. We painted the cabinets black. I still need to add something to the window...I'll let you know when I do...it's on the never-ending "list..."


Okay, so here's a reminder of before:


Me too. :) Changing subjects...
Here are a few frugal decor tips I like to use:
* old books *
They are like old friends~they just add something to your home by simply being there. You can use them to add some color and texture, give height to objects, and have wisdom in the pages to turn to any time you want to. There is just something comforting and wise about them...and are all over at yard sales and thrift stores.

* candles *
You can find at inexpensive prices almost anywhere nowadays in great colors. In the picture above, I just wrapped a strip of scrapbook paper from Hobby Lobby around it, taped the back and added a ribbon. Place it on top of some old books and you're set!

If you don't want early birds, you may want to put "early birds pay double" in your ad. :) Remember that they can be your best friends though, because you don't have to lower your price on anything that early in the morning. I welcome people to look around as we're pulling stuff out.

 pic source
This is an appropriate post for Earth Day as well, since I believe yard sales are the ultimate form of recycling. Instead of adding to a landfill, you are passing it on to someone else to use. When you go to yard sales, you find items to re-purpose instead of buying new. You are also supporting the American economy, because of your money goes into the pockets of your fellow citizens. Now that we have warm fuzzies about yard sales, here we go.


** Click here for printable recipe **
or
** Click here for half recipe **
3 tablespoon active dry yeast
1 cup honey or 3/4 cup sugar
1/4 cup oil
1-1/2 tablespoon salt
11-12 cups all-purpose flour or bread flour
By hand: Combine water, yeast, sugar (or honey), oil, salt, and mix together with wire whisk in large bowl. Begin adding flour 1 cup at a time and mix with large wooden spoon until it's too big to stir. Turn dough out on floured surface and continue adding flour 1 cup at a time and knead it in until soft and smooth. Knead for 8-10 minutes by hand.


* another note from Melissa on this one: I heat my oven to 170 degrees and then I put my dough in the pans in there to let it rise in a warm, protected spot (away from my kids!) It rises more quickly for me this way as well. (usually just about 30 minutes!) When they have risen I keep them in the oven and just switch the temperature to 350 and bake.


** Click here for printable recipe **
OR
** Click here for half recipe **

Oh, goodness, I'll tell you the ugly story:
 They are big, fat, beautiful and heavy. So, I hung the mirrors, and then I wanted to position the ribbon and the knobs just right, so I took the screws out and put a bunch of hot glue on the back to hold them in place while I hung the ribbon. I wanted my husband to help me put the screws in with some drywall anchors later. Well, of course there were a million other things going on that day: pricing everything for the yard sale, getting it over to my friend's house for the sale, my daughter had a performance at a PTA meeting, and then on top of it, we had our first tornado watch since we've been in Texas. I've never seen such big hail in my life and there were some twisters outside of town that were coming down from wall clouds they were worried would touch down. Yikes!
 I completely forgot about my knobs hot glued up there. There was really loud thunder and lightning all night and sometime in the middle of the night I heard a big *crash.* I was exhausted and out of it and thought it was thunder. My husband was in the kitchen burning the midnight oil preparing for classes the next day and heard it and came in and asked if everything was ok, I said yea, it was just thunder. I wake up the next morning groggy-eyed and see a big black mark in the sink:
I go to wipe it off, but my finger goes right through it!! Yes, it was a hole. That beautiful knob fell from way up high, and smashed right through the sink. I'm sure the humidity from the thunderstorm didn't help anything either. The knob didn't have a mark on it, but the sink sure did. Ugghhhh. Adventures of Melissa in re-modeling...
 The yard sale was a huge success, but guess where my money will be going?
a new sink.
Do you think those knobs will be going up?? Oh no, I'm afraid they are banished from the house.
I'll have some "Having a Yard Sale" posts up later this week....I'm not going to break anything else, I'm not going to break anything else...


First of all, thank you so much for all of the great tips for the spray paint bubbling. I think I was spraying way too close and it probably wasn't completely dry yet either. If those plates ever make it up onto my wall it will be a miracle...
Anyway! I ran to Target this morning to grab some more yard sale stickers (I'm joining my friend that is having one this weekend) and do you think that's all I walked out with?
Oh no...
 They had just marked all of their Easter stuff 75% off. They had some adorable things that could be used for all year around. Look in the kitchen section too~there was an endcap of Easter stuff they hadn't moved over to the Easter clearance aisle yet. See all the bright green tags? Anything with those on it are considered Easter. I usually wait until 90% off, but I didn't want to risk it not being there, so I loaded up.
a sweet stitched bunny towel, and some adorable magnets:
 I also won Nicole's giveaway at Our Cozy Nest and look what I got:
 I love them and still marvel at all the sewing skills out there, of which I have none.
So, thank you again ladies~they were so fun to get in the mail! They both have great blogs and Etsy shops, so go pay them a visit.
Off to find more stuff to sell at the yard sale to make up for what I spent this morning... :)

 Can anyone explain why this happens?? The other plate didn't do this, I used the same paint, etc. etc.
 I now know what y'all are talking about, so I'm throwing it out there and hoping someone can help...


Take them out to my workshop, a.k.a my garage with an old carpet remnant on the ground. The carpet serves 2 purposes: soak up oil from our little old car my husband drives and my spray paint center.

Set the glass and the picture aside, cut the paper to fit the frame, hot glue the paper to the back of the frame:

It looks great just like that, but we're going to add our keys...
 Hot glue them on, and there you have it.
 You see what it's sitting on? The top of my washing machine is my glue gun center.


 painting by Walter Rane
*sniff*
Don't forget the shabby strap giveaway...and have a wonderful Easter weekend. I'll put a little Good Friday message up tonight when I'm done mourning my broken plates...

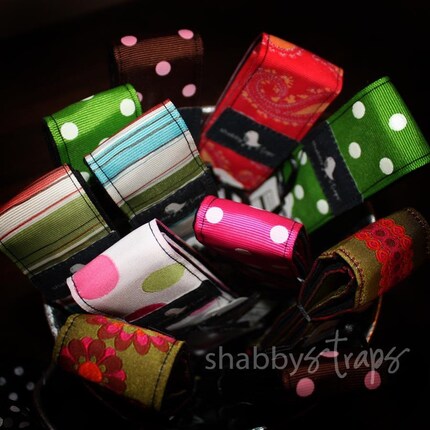
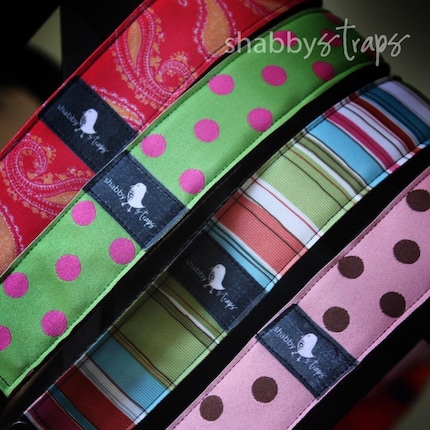 I got the best package in the mail this week! My husband got me a camera strap for my birthday from my dear friend, Amanda. We were roommates in college and she knows me better than a lot of people would care to :) I love her to pieces~
 She has always had amazing taste and I was thrilled when I saw she had sent along some extras to give away here!! You will fall in love with these~they just give your camera a touch of color and personality and set you apart from the sea of black and silver cameras out there...
 Don't you love them? to enter, go to the Shabby Straps Etsy Shop, and then come back here and tell me which strap is your favorite in your comment. There will be one winner for a larger DSLR camera strap and one for a smaller point and shoot wrist strap.
 You can enter until Saturday at midnight and I'll announce the winners on Monday...good luck!
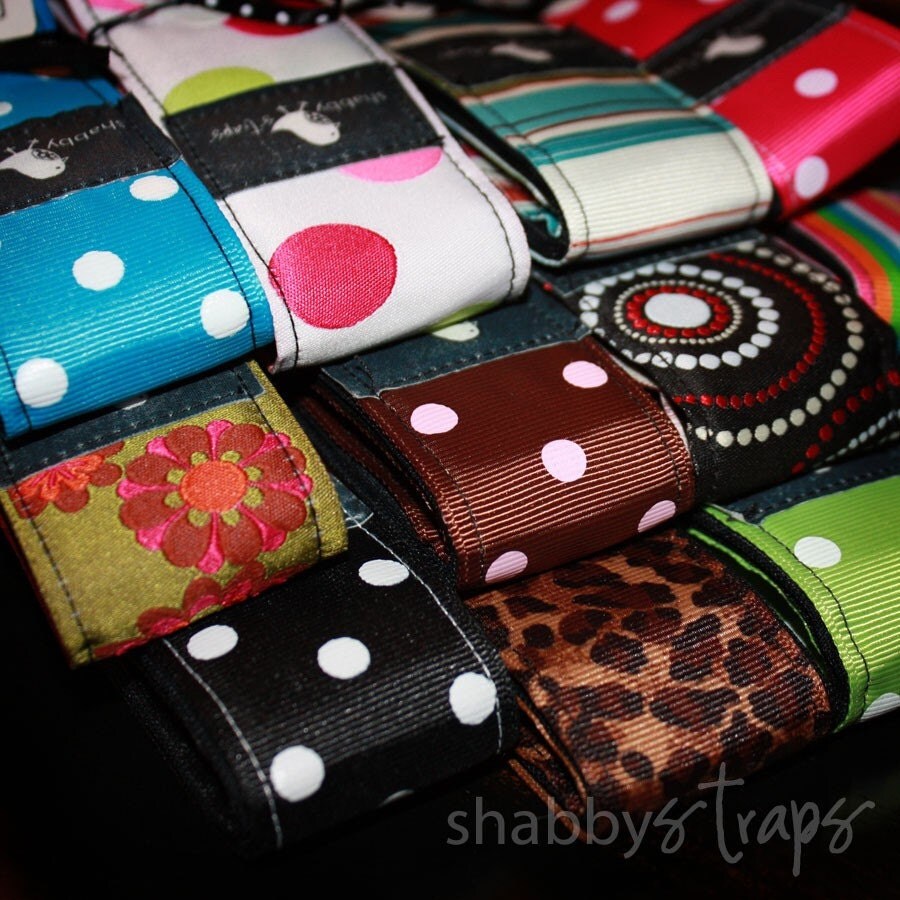 Thank you, Amanda! Happy Thursday to y'all~
 photo from Martha Stewart
  Remember the plates I found at Target back in February? I loved the little beaded edge, but wasn't crazy about the pattern. So, I spray painted them cream with~be sure to spray a couple of light coats, letting it dry completely in between so you don't have drips.
 I cut up the napkin and there were three layers~I just gently took off the top layer to use.
 I don't have mod podge, but you can make your own by using elmer's glue and just watering it down. I put a thin layer on the plate, placed the napkin layer down,
 and then gently added a thin layer on top and smoothed out any bubbles. The nice thing about this is if you make any mistakes, you just take it right off, wipe the glue off and try again. It took me two takes.
 I love how they turned out! If there are any flaws, they are going to be up high where no one will notice~I'm hanging them in the dressing area of my bathroom.
**Side note: "I might learn to like her. Hang her in my bathroom." Can anyone name the movie?? **
The bathroom's coming...I may just have some pics to show you next week! But for now, this works for me. I'll see you back here tomorrow for a fun giveaway~I think you'll love it! Have a great day~

Social Icons